Installing 11g RAC on Linux VM: Install Oracle Clusterware
Previous: Copy/clone this virtual machine to create second node and modify host details
The clusterware or database installation needs to be started only on one node since it will propagate the files to remote node automatically during the installation.
If you have the setup files on your host machine, you can share the setup folder to the VM using VMWare or Oracle VirtualBox shared folder option.
Following screen shows how to share a folder to VM using VMWare. This can be done even when the VM is online.
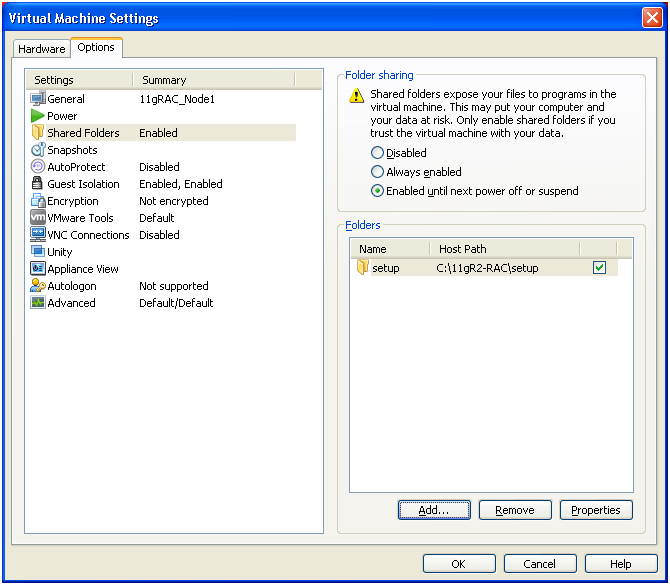
The files which you share using above option will be available by default at /mnt/hgfs/ directory under Linux.
Now let us start the Oracle Clusterware installation.
Login with oracle user (grid owner)
[oracle@dbhost1 ~]$ cd /mnt/hgfs/setup/grid/
Start the installation using ./runInstaller script
[oracle@dbhost1 grid]$ ./runInstaller
…

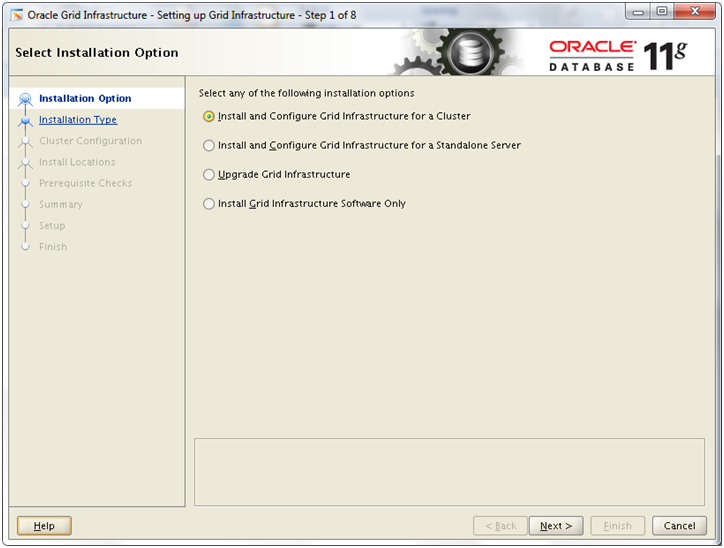
Select “Install and Configure Grid Infrastructure for a Cluster” and click Next
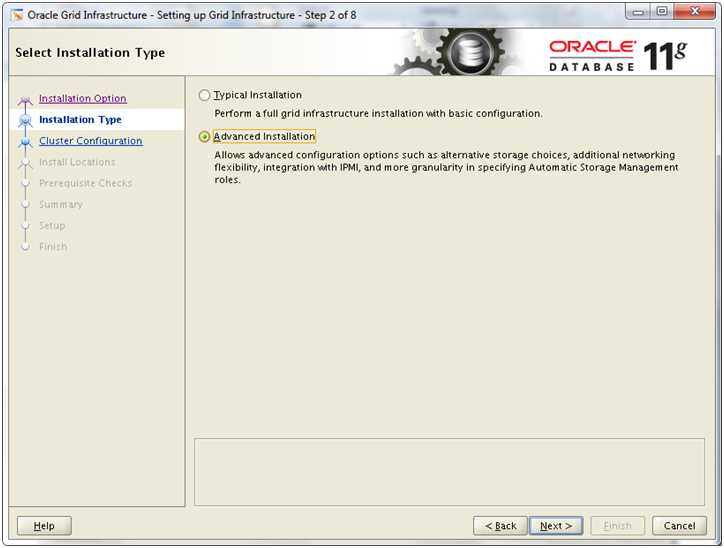
Select “Advanced Installation” and click Next
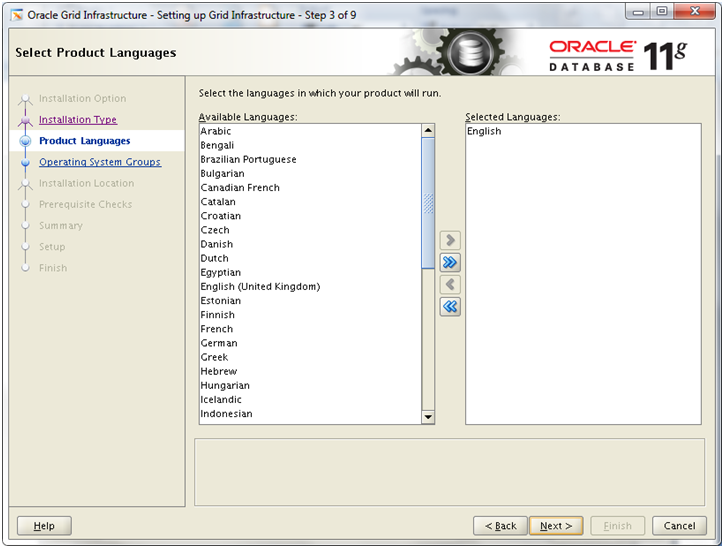
Click Next
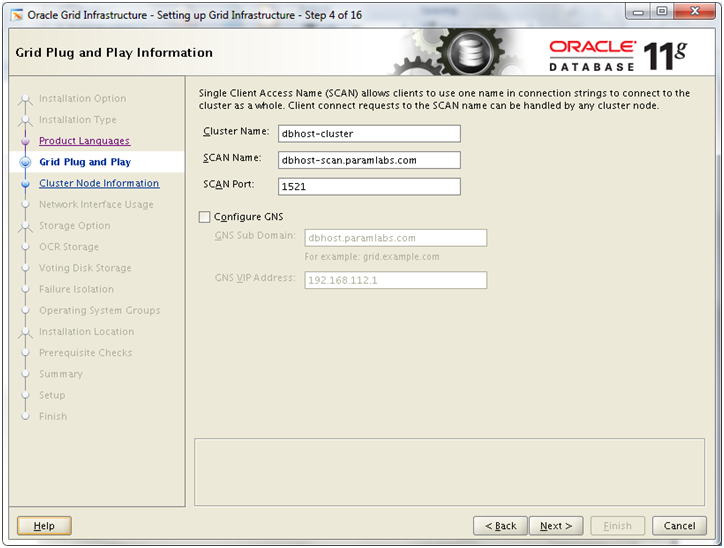
Enter details as follows and click Next. You can change the values as you want but make sure to use same values as you entered if required in other screens.
Cluster Name: dbhost-cluster
SCAN Name: dbhost-scan.paramlabs.com
SCAN Port: 1521
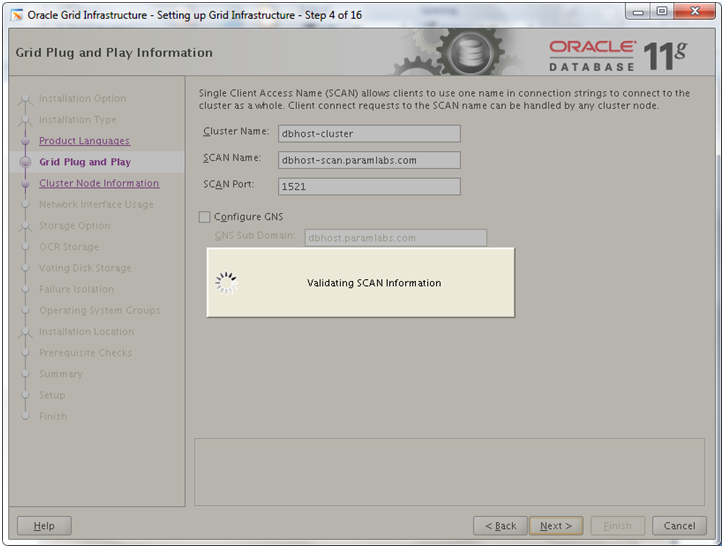
It will validate the name entered for SCAN.
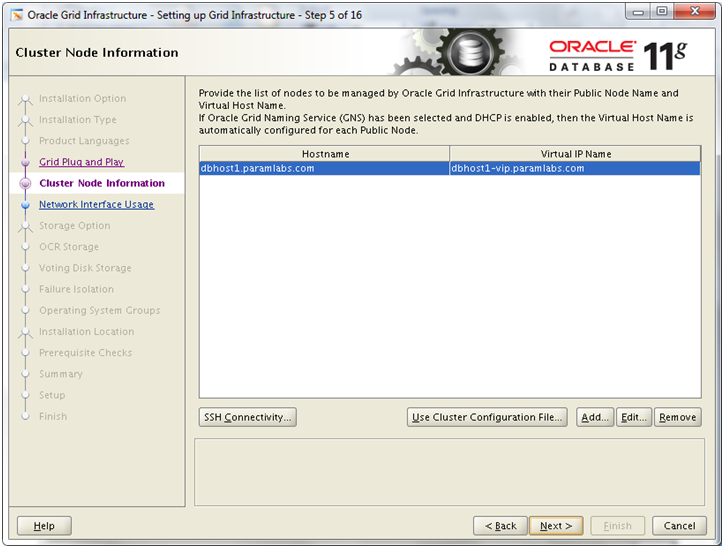
Since we have started installation on node1 and it yet does not recognize node2, it will only show 1 node here. Now we need to manually add another node in the cluster. Click Add
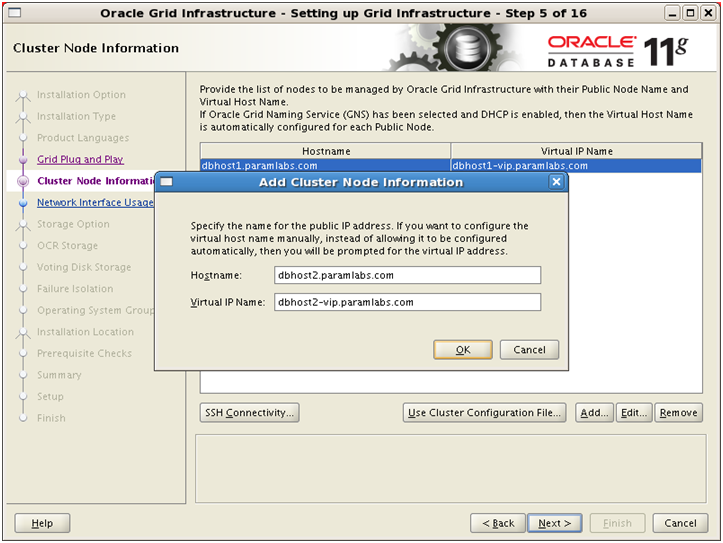
Enter hostname and VIP name for second node. Click Ok
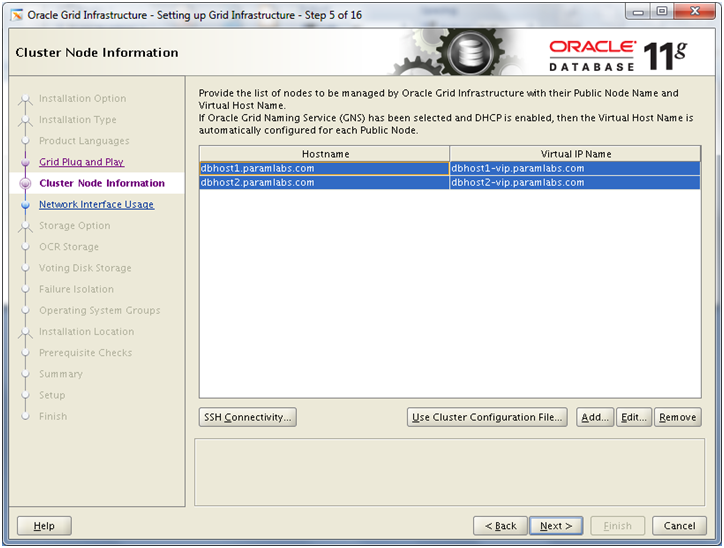
Now both nodes will appear on the screen. Make sure to select both values and then click Next
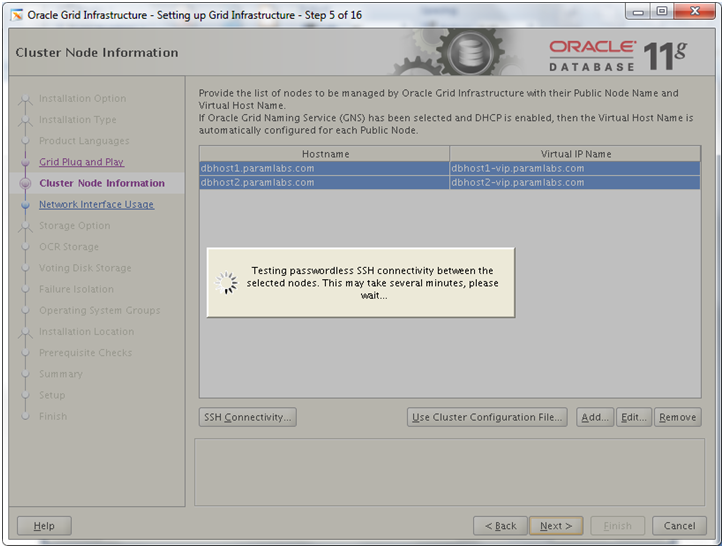
It will do various tests including ssh connectivity, node readiness, user equivalence and check for existing public/private interfaces on the hosts.


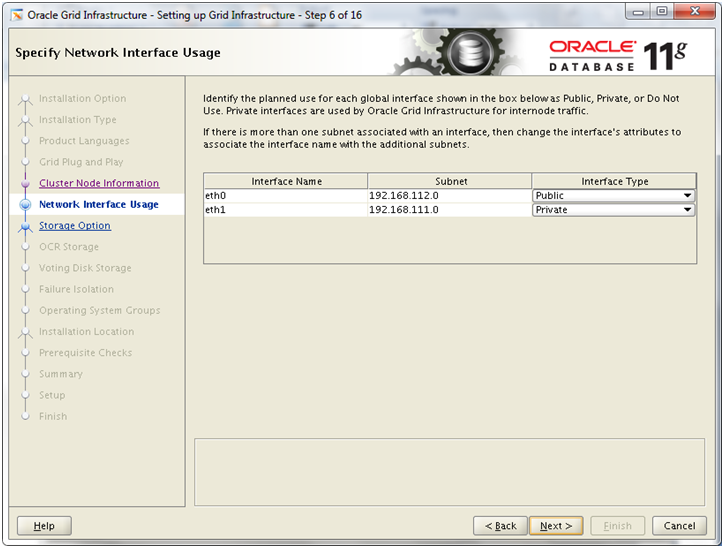
It will detect eth0 as public and eth1 as private. This is exactly what we want. If not detected automatically, set as above and click Next
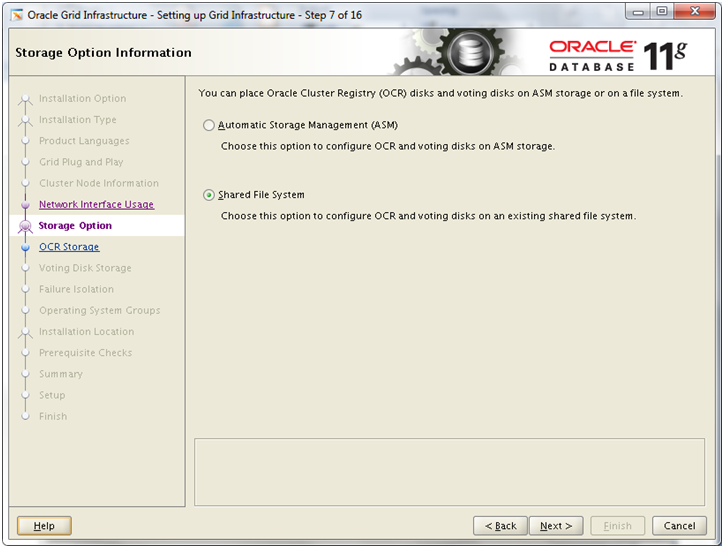
Select Shared File system and click Next
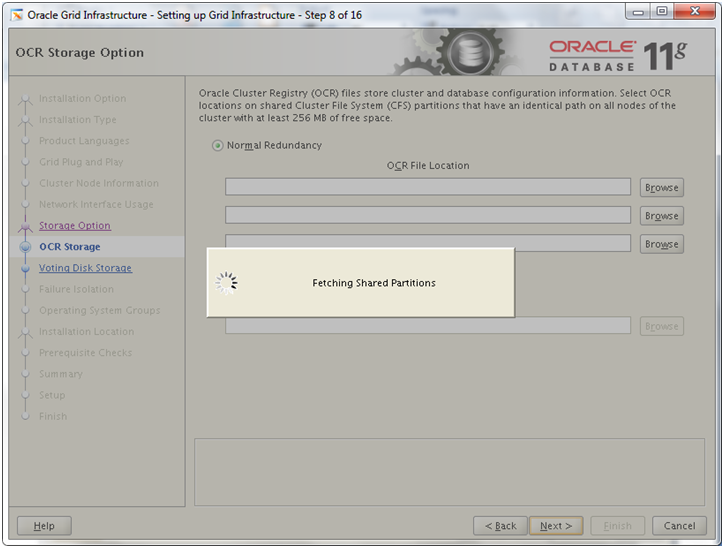
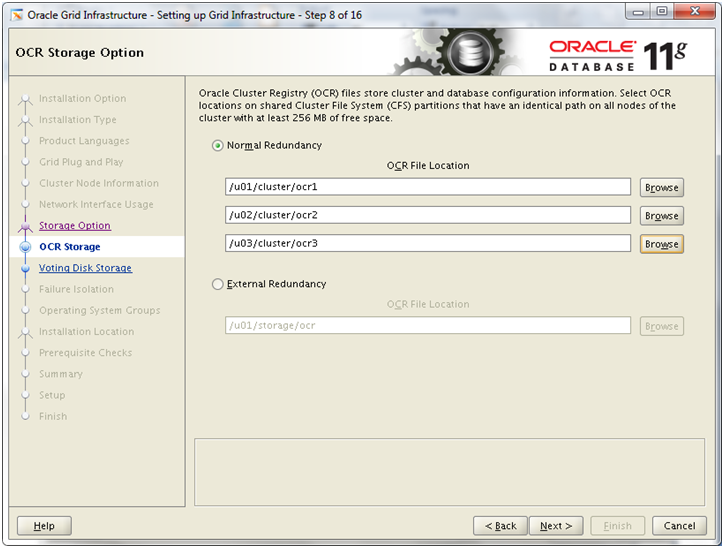
Important Note: Since having normal redundancy increases the load on VM to make sure NFS communicates and keeps all these files in sync all the time, we might face issues during normal run of the Oracle RAC.
So please select EXTERNAL REDUNDANCY which means that you are going to mirror this disk using external methods. Though we are not using any external mirroring here but still for the non-production and learning purpose we can take this risk.
Enter following value in External Redundancy box. Click Next
/u01/storage/ocr
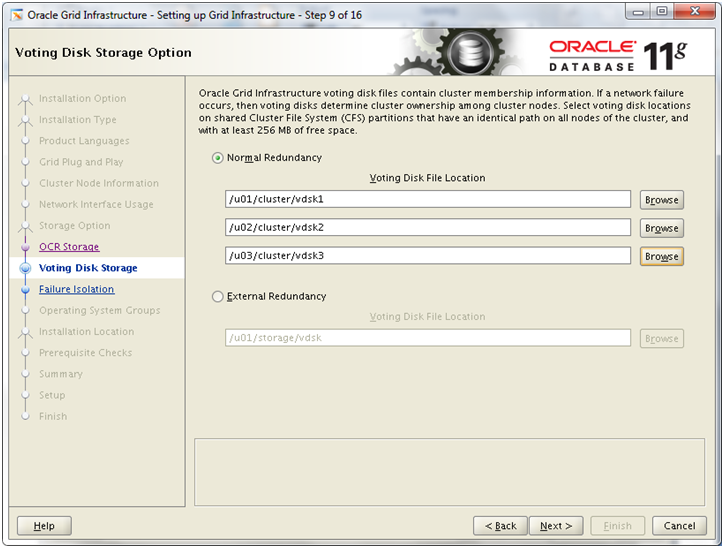
Important Note: Since having normal redundancy increases the load on VM to make sure NFS communicates and keeps all these files in sync all the time, we might face issues during normal run of the Oracle RAC.
So please select EXTERNAL REDUNDANCY which means that you are going to mirror this disk using external methods. Though we are not using any external mirroring here but still for the non-production and learning purpose we can take this risk.
Enter following value in External Redundancy box. Click Next
/u01/storage/vdsk
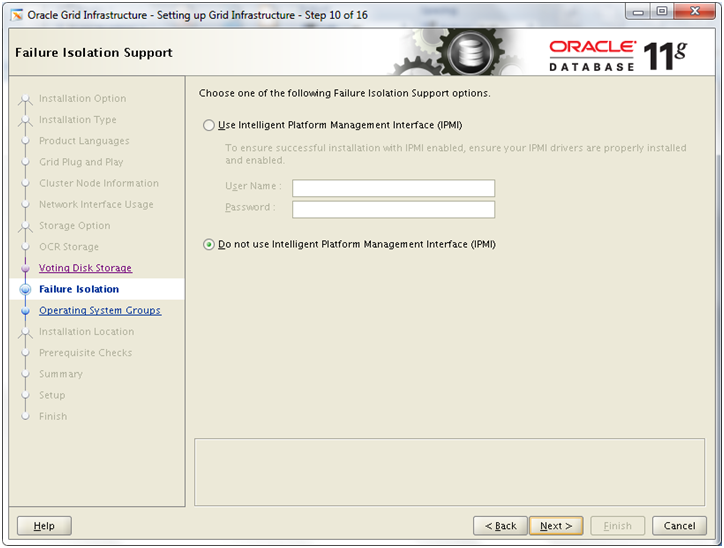
Select Do not use IPMI and click Next
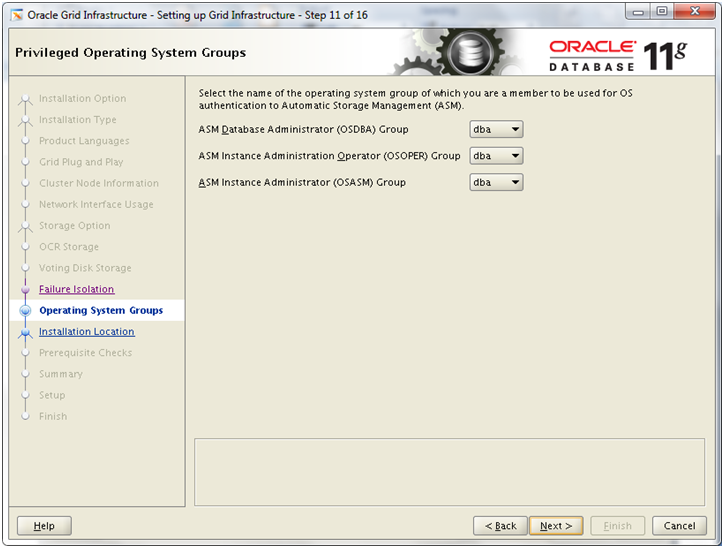
We have selected dba for all the above groups, you can choose different if you wish to. Click Next
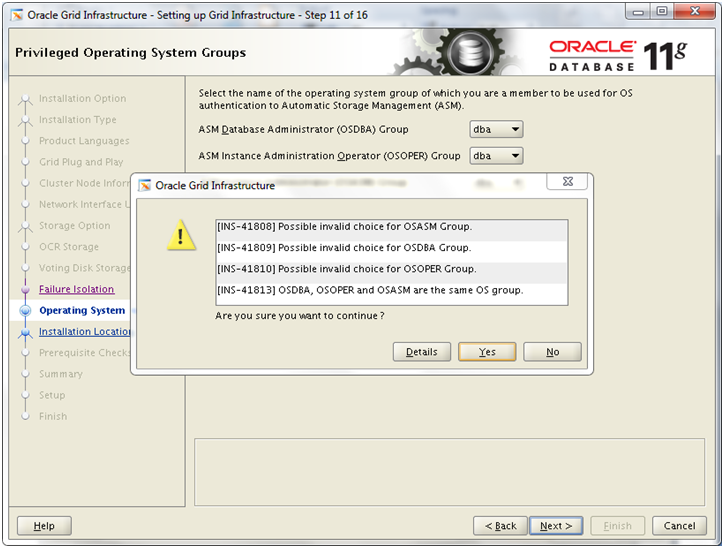
If you chose dba as all above groups, you might see above message box, click Yes
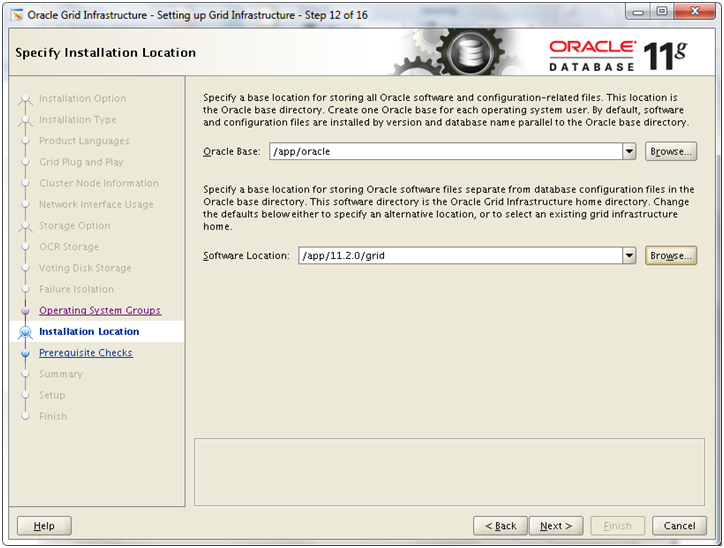
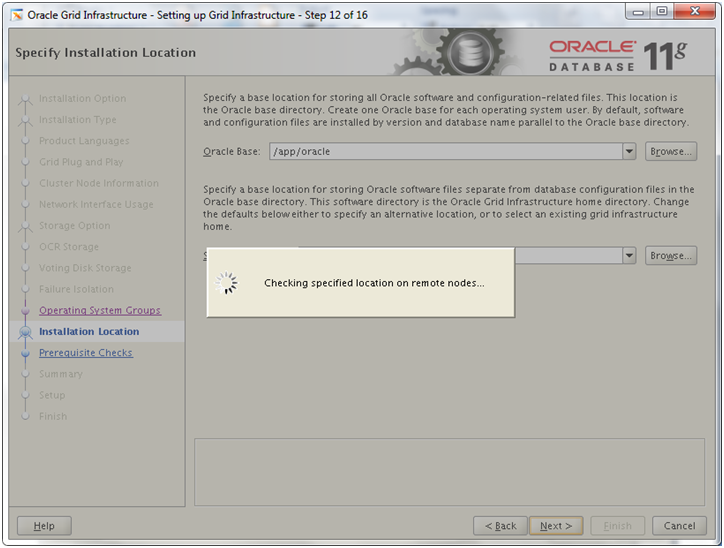
Enter following values and click Next
Oracle Base: /app/oracle
Software Location: /app/11.2.0/grid
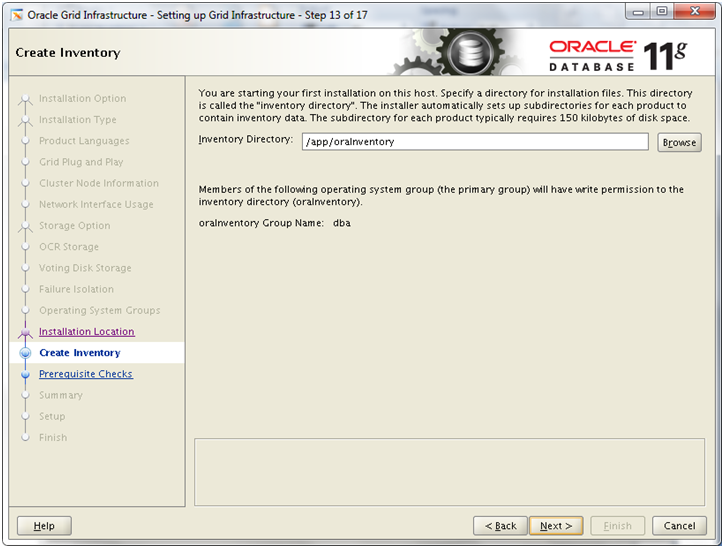
Enter /app/oraInventory for the Inventory location. Click Next
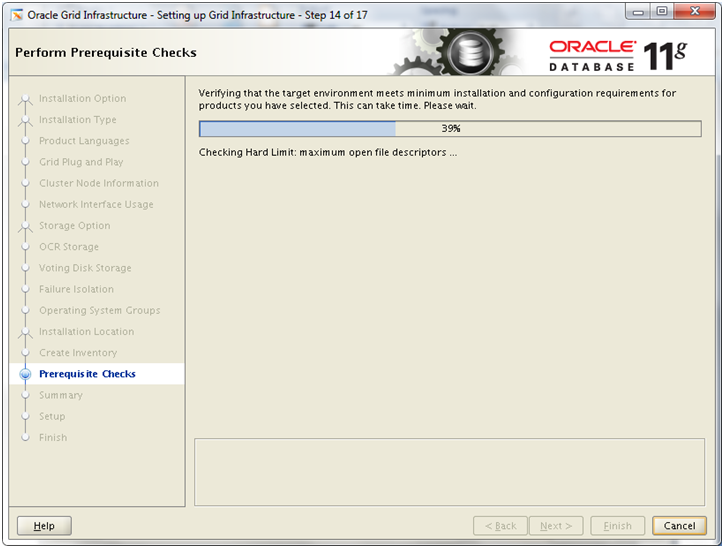
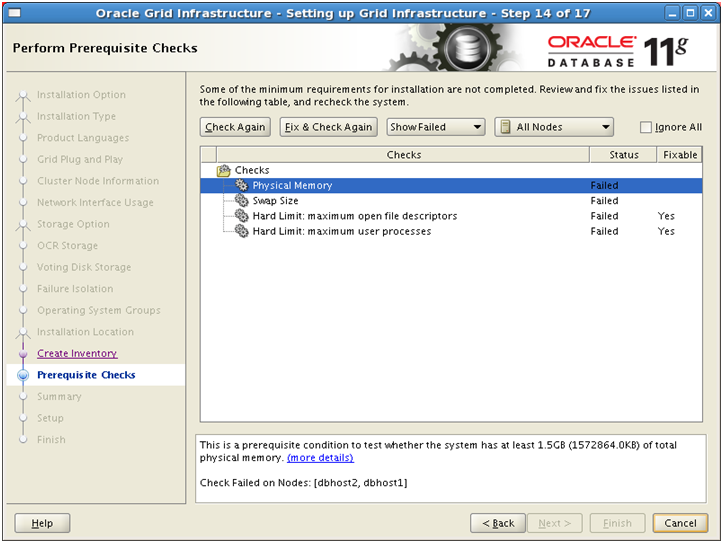
You might see above failed pre-requisites. We have specifically not applied the above pre-reqs just to show you that now Oracle will generate a script to fix all required pre-reqs in this screen where the value in column “Fixable” is Yes
Regarding physical memory and swap, we can ignore these. Click on “Fix and Check Again” to generate the fix script
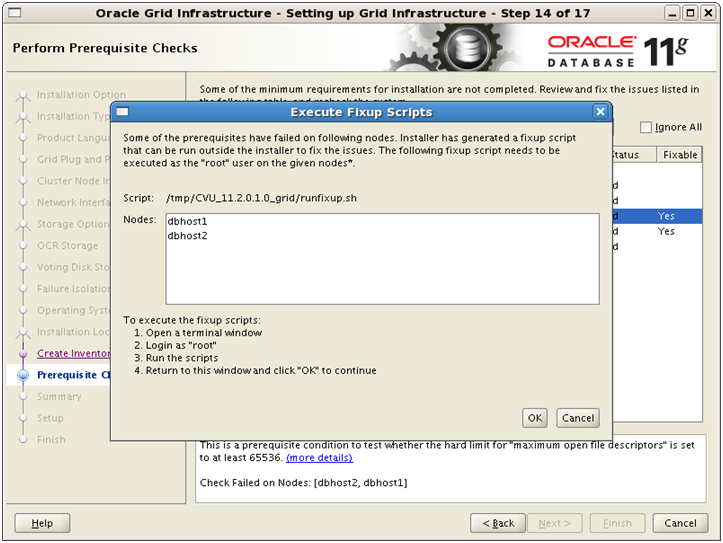
It will show above screen with location of runfixup.sh script which you need to run as root
on both nodes.
[root@dbhost1 ~]# /tmp/CVU_11.2.0.1.0_grid/runfixup.sh
Response file being used is :/tmp/CVU_11.2.0.1.0_grid/fixup.response
Enable file being used is :/tmp/CVU_11.2.0.1.0_grid/fixup.enable
Log file location: /tmp/CVU_11.2.0.1.0_grid/orarun.log
uid=54322(grid) gid=54322(dba) groups=54322(dba),54321(oinstall)
[root@dbhost2 ~]# /tmp/CVU_11.2.0.1.0_grid/runfixup.sh
Response file being used is :/tmp/CVU_11.2.0.1.0_grid/fixup.response
Enable file being used is :/tmp/CVU_11.2.0.1.0_grid/fixup.enable
Log file location: /tmp/CVU_11.2.0.1.0_grid/orarun.log
uid=54322(grid) gid=54322(dba) groups=54322(dba),54321(oinstall)
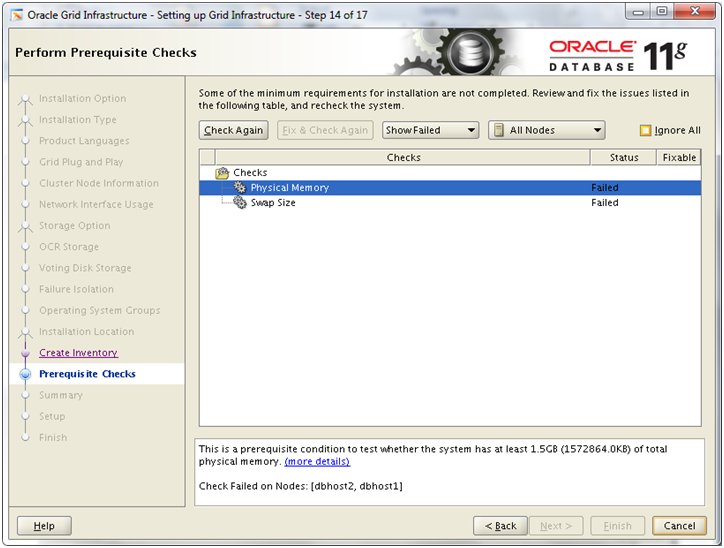
Now it will only show above 2 memory related errors. We can ignore them. Check Ignore All
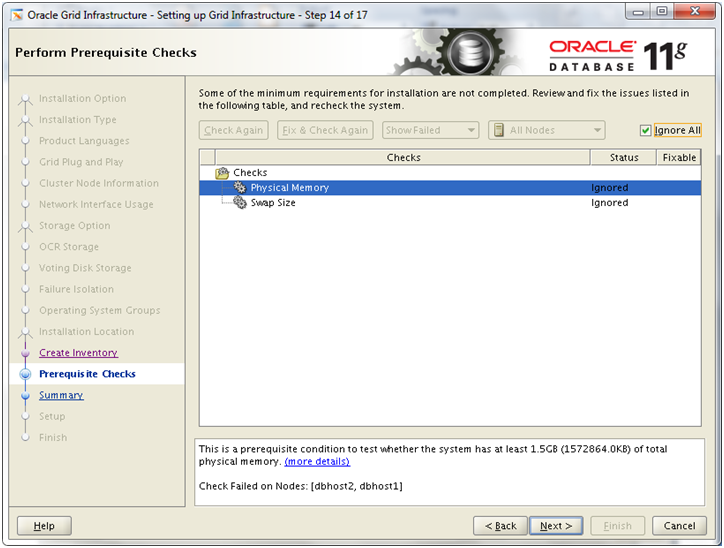
Click Next
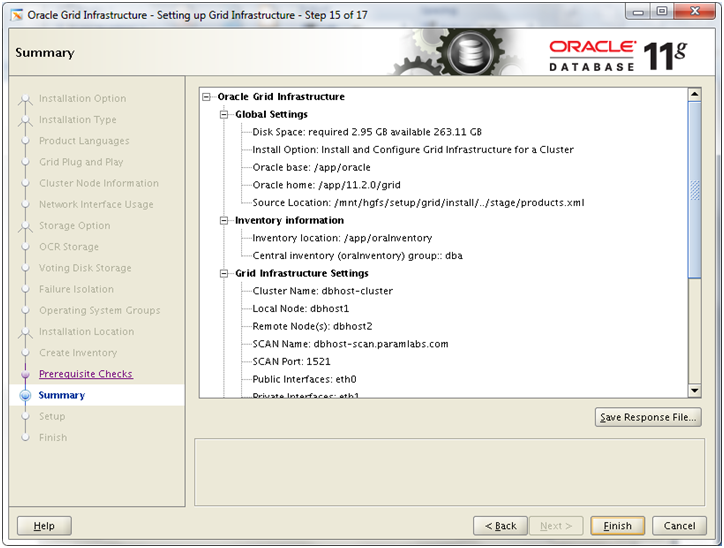
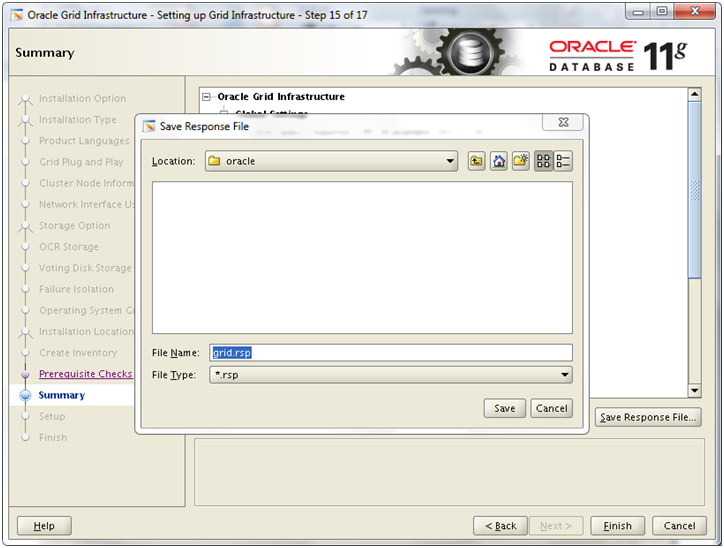
Review the summary and click Finish to begin installation. If you wish you can save the response file as follows before clicking on finish.
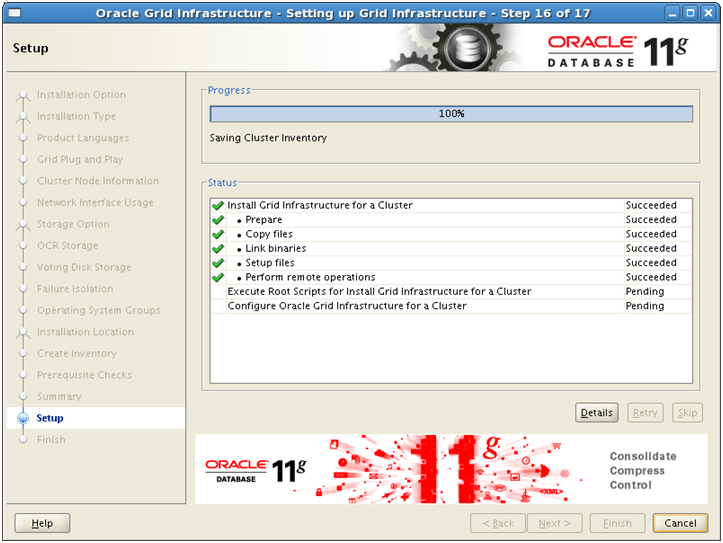
After installation is finished on node 1, it will propagate the files on node 2. After which it will need to run some scripts as root user.
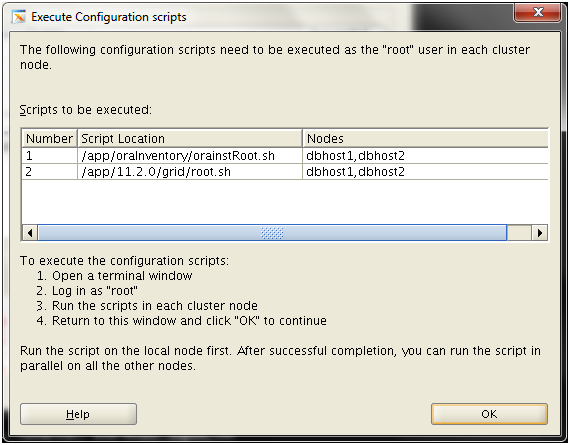
Run first script on both nodes and then second script on both nodes.
[root@dbhost1 ~]# /app/oraInventory/orainstRoot.sh
Changing permissions of /app/oraInventory.
Adding read,write permissions for group.
Removing read,write,execute permissions for world.
Changing groupname of /app/oraInventory to dba.
The execution of the script is complete.
[root@dbhost2 ~]# /app/oraInventory/orainstRoot.sh
Changing permissions of /app/oraInventory.
Adding read,write permissions for group.
Removing read,write,execute permissions for world.
Changing groupname of /app/oraInventory to dba.
The execution of the script is complete.
[root@dbhost1 ~]# /app/11.2.0/grid/root.sh
Running Oracle 11g root.sh script…
The following environment variables are set as:
ORACLE_OWNER= oracle
ORACLE_HOME= /app/11.2.0/grid
Enter the full pathname of the local bin directory: [/usr/local/bin]:
Copying dbhome to /usr/local/bin …
Copying oraenv to /usr/local/bin …
Copying coraenv to /usr/local/bin …
Creating /etc/oratab file…
Entries will be added to the /etc/oratab file as needed by
Database Configuration Assistant when a database is created
Finished running generic part of root.sh script.
Now product-specific root actions will be performed.
2013-02-19 12:35:15: Parsing the host name
2013-02-19 12:35:15: Checking for super user privileges
2013-02-19 12:35:15: User has super user privileges
Using configuration parameter file: /app/11.2.0/grid/crs/install/crsconfig_params
Creating trace directory
LOCAL ADD MODE
Creating OCR keys for user ‘root’, privgrp ‘root’..
Operation successful.
root wallet
root wallet cert
root cert export
peer wallet
profile reader wallet
pa wallet
peer wallet keys
pa wallet keys
peer cert request
pa cert request
peer cert
pa cert
peer root cert TP
profile reader root cert TP
pa root cert TP
peer pa cert TP
pa peer cert TP
profile reader pa cert TP
profile reader peer cert TP
peer user cert
pa user cert
Adding daemon to inittab
CRS-4123: Oracle High Availability Services has been started.
ohasd is starting
acfsroot: ACFS-9301: ADVM/ACFS installation can not proceed:
acfsroot: ACFS-9302: No installation files found at /app/11.2.0/grid/install/usm/EL5/x86_64/2.6.18-8/2.6.18-8.el5uek-x86_64/bin.
CRS-2672: Attempting to start ‘ora.gipcd’ on ‘dbhost1’
CRS-2672: Attempting to start ‘ora.mdnsd’ on ‘dbhost1’
CRS-2676: Start of ‘ora.gipcd’ on ‘dbhost1’ succeeded
CRS-2676: Start of ‘ora.mdnsd’ on ‘dbhost1’ succeeded
CRS-2672: Attempting to start ‘ora.gpnpd’ on ‘dbhost1’
CRS-2676: Start of ‘ora.gpnpd’ on ‘dbhost1’ succeeded
CRS-2672: Attempting to start ‘ora.cssdmonitor’ on ‘dbhost1’
CRS-2676: Start of ‘ora.cssdmonitor’ on ‘dbhost1’ succeeded
CRS-2672: Attempting to start ‘ora.cssd’ on ‘dbhost1’
CRS-2672: Attempting to start ‘ora.diskmon’ on ‘dbhost1’
CRS-2676: Start of ‘ora.diskmon’ on ‘dbhost1’ succeeded
CRS-2676: Start of ‘ora.cssd’ on ‘dbhost1’ succeeded
CRS-2672: Attempting to start ‘ora.ctssd’ on ‘dbhost1’
CRS-2676: Start of ‘ora.ctssd’ on ‘dbhost1’ succeeded
clscfg: -install mode specified
Successfully accumulated necessary OCR keys.
Creating OCR keys for user ‘root’, privgrp ‘root’..
Operation successful.
CRS-2672: Attempting to start ‘ora.crsd’ on ‘dbhost1’
CRS-2676: Start of ‘ora.crsd’ on ‘dbhost1’ succeeded
Now formatting voting disk: /u01/cluster/vdsk1.
Now formatting voting disk: /u02/cluster/vdsk2.
Now formatting voting disk: /u03/cluster/vdsk3.
CRS-4603: Successful addition of voting disk /u01/cluster/vdsk1.
CRS-4603: Successful addition of voting disk /u02/cluster/vdsk2.
CRS-4603: Successful addition of voting disk /u03/cluster/vdsk3.
## STATE File Universal Id File Name Disk group
— —– —————– ——— ———
1. ONLINE 91ce08c1a7254ff5bfe2d1125bafd956 (/u01/cluster/vdsk1) []
2. ONLINE 44f4d1a582e54ffdbf600efd4fb30cff (/u02/cluster/vdsk2) []
3. ONLINE 60b10b42b1334f2fbf753c9a4a4e85d2 (/u03/cluster/vdsk3) []
Located 3 voting disk(s).
CRS-2673: Attempting to stop ‘ora.crsd’ on ‘dbhost1’
CRS-2677: Stop of ‘ora.crsd’ on ‘dbhost1’ succeeded
CRS-2673: Attempting to stop ‘ora.ctssd’ on ‘dbhost1’
CRS-2677: Stop of ‘ora.ctssd’ on ‘dbhost1’ succeeded
CRS-2673: Attempting to stop ‘ora.cssdmonitor’ on ‘dbhost1’
CRS-2677: Stop of ‘ora.cssdmonitor’ on ‘dbhost1’ succeeded
CRS-2673: Attempting to stop ‘ora.cssd’ on ‘dbhost1’
CRS-2677: Stop of ‘ora.cssd’ on ‘dbhost1’ succeeded
CRS-2673: Attempting to stop ‘ora.gpnpd’ on ‘dbhost1’
CRS-2677: Stop of ‘ora.gpnpd’ on ‘dbhost1’ succeeded
CRS-2673: Attempting to stop ‘ora.gipcd’ on ‘dbhost1’
CRS-2677: Stop of ‘ora.gipcd’ on ‘dbhost1’ succeeded
CRS-2673: Attempting to stop ‘ora.mdnsd’ on ‘dbhost1’
CRS-2677: Stop of ‘ora.mdnsd’ on ‘dbhost1’ succeeded
CRS-2672: Attempting to start ‘ora.mdnsd’ on ‘dbhost1’
CRS-2676: Start of ‘ora.mdnsd’ on ‘dbhost1’ succeeded
CRS-2672: Attempting to start ‘ora.gipcd’ on ‘dbhost1’
CRS-2676: Start of ‘ora.gipcd’ on ‘dbhost1’ succeeded
CRS-2672: Attempting to start ‘ora.gpnpd’ on ‘dbhost1’
CRS-2676: Start of ‘ora.gpnpd’ on ‘dbhost1’ succeeded
CRS-2672: Attempting to start ‘ora.cssdmonitor’ on ‘dbhost1’
CRS-2676: Start of ‘ora.cssdmonitor’ on ‘dbhost1’ succeeded
CRS-2672: Attempting to start ‘ora.cssd’ on ‘dbhost1’
CRS-2672: Attempting to start ‘ora.diskmon’ on ‘dbhost1’
CRS-2676: Start of ‘ora.diskmon’ on ‘dbhost1’ succeeded
CRS-2676: Start of ‘ora.cssd’ on ‘dbhost1’ succeeded
CRS-2672: Attempting to start ‘ora.ctssd’ on ‘dbhost1’
CRS-2676: Start of ‘ora.ctssd’ on ‘dbhost1’ succeeded
CRS-2672: Attempting to start ‘ora.crsd’ on ‘dbhost1’
CRS-2676: Start of ‘ora.crsd’ on ‘dbhost1’ succeeded
CRS-2672: Attempting to start ‘ora.evmd’ on ‘dbhost1’
CRS-2676: Start of ‘ora.evmd’ on ‘dbhost1’ succeeded
dbhost1 2013/02/19 12:42:00 /app/11.2.0/grid/cdata/dbhost1/backup_20130219_124200.olr
Preparing packages for installation…
cvuqdisk-1.0.7-1
Configure Oracle Grid Infrastructure for a Cluster … succeeded
Updating inventory properties for clusterware
Starting Oracle Universal Installer…
Checking swap space: must be greater than 500 MB. Actual 8178 MB Passed
The inventory pointer is located at /etc/oraInst.loc
The inventory is located at /app/oraInventory
‘UpdateNodeList’ was successful.
====
[root@dbhost2 ~]# /app/11.2.0/grid/root.sh
Running Oracle 11g root.sh script…
The following environment variables are set as:
ORACLE_OWNER= oracle
ORACLE_HOME= /app/11.2.0/grid
Enter the full pathname of the local bin directory: [/usr/local/bin]:
Copying dbhome to /usr/local/bin …
Copying oraenv to /usr/local/bin …
Copying coraenv to /usr/local/bin …
Creating /etc/oratab file…
Entries will be added to the /etc/oratab file as needed by
Database Configuration Assistant when a database is created
Finished running generic part of root.sh script.
Now product-specific root actions will be performed.
2013-02-19 12:44:08: Parsing the host name
2013-02-19 12:44:08: Checking for super user privileges
2013-02-19 12:44:08: User has super user privileges
Using configuration parameter file: /app/11.2.0/grid/crs/install/crsconfig_params
Creating trace directory
LOCAL ADD MODE
Creating OCR keys for user ‘root’, privgrp ‘root’..
Operation successful.
Adding daemon to inittab
CRS-4123: Oracle High Availability Services has been started.
ohasd is starting
acfsroot: ACFS-9301: ADVM/ACFS installation can not proceed:
acfsroot: ACFS-9302: No installation files found at /app/11.2.0/grid/install/usm/EL5/x86_64/2.6.18-8/2.6.18-8.el5uek-x86_64/bin.
CRS-4402: The CSS daemon was started in exclusive mode but found an active CSS daemon on node dbhost1, number 1, and is terminating
CRS-2673: Attempting to stop ‘ora.cssdmonitor’ on ‘dbhost2’
CRS-2677: Stop of ‘ora.cssdmonitor’ on ‘dbhost2’ succeeded
An active cluster was found during exclusive startup, restarting to join the cluster
CRS-2672: Attempting to start ‘ora.mdnsd’ on ‘dbhost2’
CRS-2676: Start of ‘ora.mdnsd’ on ‘dbhost2’ succeeded
CRS-2672: Attempting to start ‘ora.gipcd’ on ‘dbhost2’
CRS-2676: Start of ‘ora.gipcd’ on ‘dbhost2’ succeeded
CRS-2672: Attempting to start ‘ora.gpnpd’ on ‘dbhost2’
CRS-2676: Start of ‘ora.gpnpd’ on ‘dbhost2’ succeeded
CRS-2672: Attempting to start ‘ora.cssdmonitor’ on ‘dbhost2’
CRS-2676: Start of ‘ora.cssdmonitor’ on ‘dbhost2’ succeeded
CRS-2672: Attempting to start ‘ora.cssd’ on ‘dbhost2’
CRS-2672: Attempting to start ‘ora.diskmon’ on ‘dbhost2’
CRS-2676: Start of ‘ora.diskmon’ on ‘dbhost2’ succeeded
CRS-2676: Start of ‘ora.cssd’ on ‘dbhost2’ succeeded
CRS-2672: Attempting to start ‘ora.ctssd’ on ‘dbhost2’
CRS-2676: Start of ‘ora.ctssd’ on ‘dbhost2’ succeeded
CRS-2672: Attempting to start ‘ora.crsd’ on ‘dbhost2’
CRS-2676: Start of ‘ora.crsd’ on ‘dbhost2’ succeeded
CRS-2672: Attempting to start ‘ora.evmd’ on ‘dbhost2’
CRS-2676: Start of ‘ora.evmd’ on ‘dbhost2’ succeeded
dbhost2 2013/02/19 12:48:37 /app/11.2.0/grid/cdata/dbhost2/backup_20130219_124837.olr
Preparing packages for installation…
cvuqdisk-1.0.7-1
Configure Oracle Grid Infrastructure for a Cluster … succeeded
Updating inventory properties for clusterware
Starting Oracle Universal Installer…
Checking swap space: must be greater than 500 MB. Actual 8188 MB Passed
The inventory pointer is located at /etc/oraInst.loc
The inventory is located at /app/oraInventory
‘UpdateNodeList’ was successful.
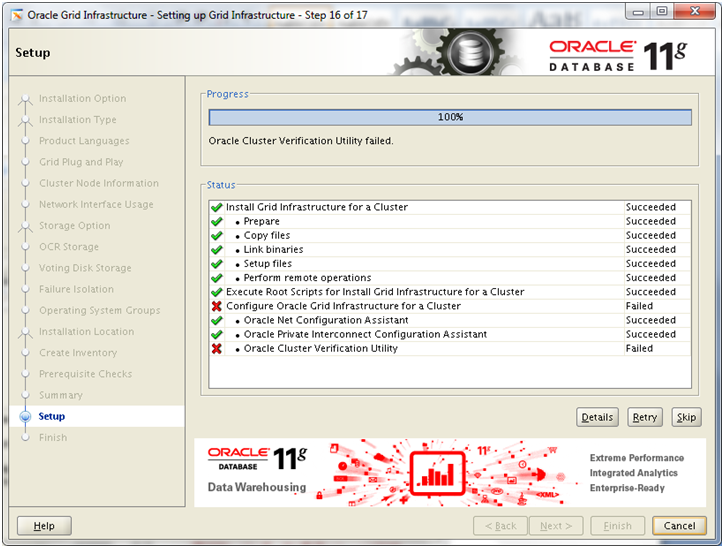
If you are not using DNS to resolve host names and only using /etc/hosts, you might see following failed step at “Oracle Cluster Verification Utility”. This is known issue and you can ignore it.
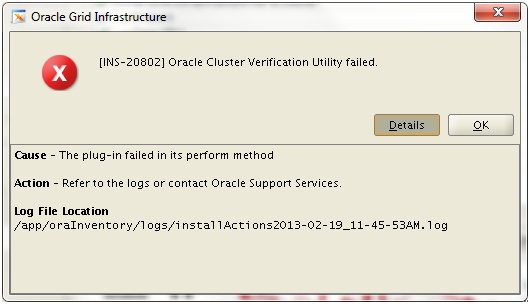
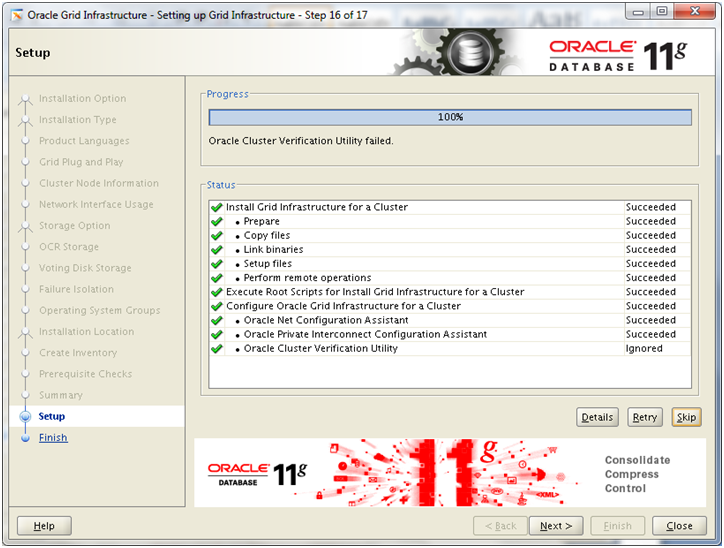
Click Skip and it will change the status as Ignored. Click Next
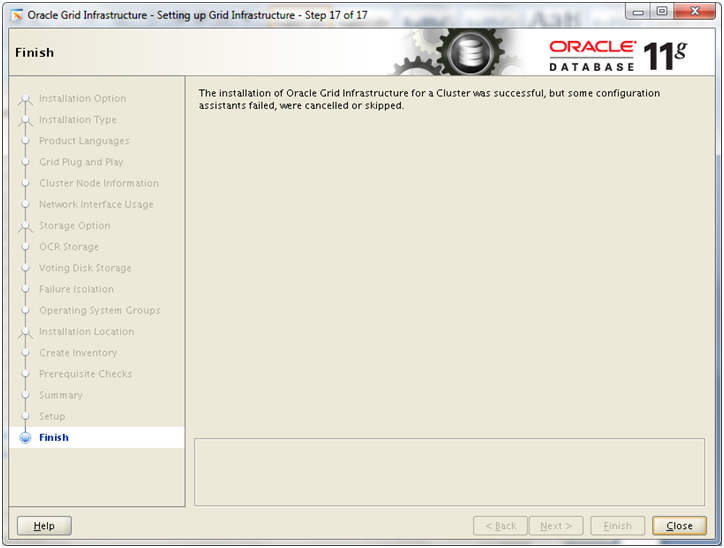
Click Close to finish the installation.
Verify that the cluster services are started properly on both nodes.
[root@dbhost2 ~]# /app/11.2.0/grid/bin/srvctl status nodeapps
VIP dbhost1-vip is enabled
VIP dbhost1-vip is running on node: dbhost1
VIP dbhost2-vip is enabled
VIP dbhost2-vip is running on node: dbhost2
Network is enabled
Network is running on node: dbhost1
Network is running on node: dbhost2
GSD is disabled
GSD is not running on node: dbhost1
GSD is not running on node: dbhost2
ONS is enabled
ONS daemon is running on node: dbhost1
ONS daemon is running on node: dbhost2
eONS is enabled
eONS daemon is running on node: dbhost1
eONS daemon is running on node: dbhost2
Next: Install Oracle Database software and create RAC database
1. Create Virtual Machine and install 64 bit Linux (generic step from previous post, not specific to this guide)
2. Add additional virtual Ethernet card and perform prerequisites in Linux
3. Copy/clone this virtual machine to create second node and modify host details
I am getting the error while running the root.sh from last node.
start scan … failed
Preparing packages for installation…
cvuqdisk-1.0.7-1
Configure Oracle Grid Infrastructure for a Cluster … failed
Updating inventory properties for clusterware
Starting Oracle Universal Installer…
Checking swap space: must be greater than 500 MB. Actual 4525 MB Passed
The inventory pointer is located at /etc/oraInst.loc
The inventory is located at /u02/oraInventory
‘UpdateNodeList’ was successful.
I cant get the ocr location right..
“ins-41317 invalid oracle cluster registry
this error comes when I give the ocr location….
hi tushar,
while installing the clusterware, ssh connectivity has been established and validated, but following error is raised..
INS-40912 Virtual host name: string is assigned to another system on the network.
currently I hv added additional ip address (for vip) in my public network and its also pinging …whereas I have read over the internet.. that it should be not pinging before hand…. so should I remove the ip (entry of vip from network adapter.. and than retry..
Regards
Shahzad
Dear Shahzad,
The IP addresses given here are for our installation and it might be conflicting with your network IPs so you are required to use IPs which are not already existing in your network. Kindly change the vip and update host entries accordingly in both servers and continue with the same.
-Tushar
Please disregard the above post, I got it resolved.
Now my only problem is to configure virtual IP address.
The message I am getting from dbca is “virtual IP address is not configured for cluster node “dbhost2″Run /u01/app/11.2.0/grid/bin/srvctl ” as root user.
please advise.
Thanks for sharing your knowledge. This is the best instruction I have come across so far and I have been able to follow and was successful.
Thank you.
Carl.
I have made so much progress and almost at the bottom line.
Below is the result I am getting.
How do I resolve this.
Thanks.
[oracle@dbhost2 ~]$ /u01/app/11.2.0/grid/bin/srvctl status nodeapps
VIP dbhost1-vip is enabled
VIP dbhost1-vip is running on node: dbhost2
Network is enabled
Network is not running on node: dbhost1
Network is running on node: dbhost2
GSD is disabled
GSD is not running on node: dbhost1
GSD is not running on node: dbhost2
ONS is enabled
ONS daemon is not running on node: dbhost1
ONS daemon is running on node: dbhost2
eONS is enabled
eONS daemon is not running on node: dbhost1
eONS daemon is running on node: dbhost2